Svgtex is a Blender plugin. It uses content of *.svg files as textures.
Svgtex utilizes the vector nature of the SVG pictures. Its textures in Blender are
always sharp and exact, regardless of the distance from the camera to the model.
This component is a free, Open Source code (available on General Public License).
Actual version — 1.0 — is written for Blender version from 2.46 to 2.49b.
Downloads:
Compiled plugin for Win32
— the
svgtex.dll and a SVG viewer (0.4 MB, for 32-bit Windows, only);
Source code
— optional: if you wish to compile yourself / change something in the code;
Would you like to repeat the actions, shown in the text below? Download the exemplary model:
the example (12 MB) — a P-40B model, with textures, used in this text;
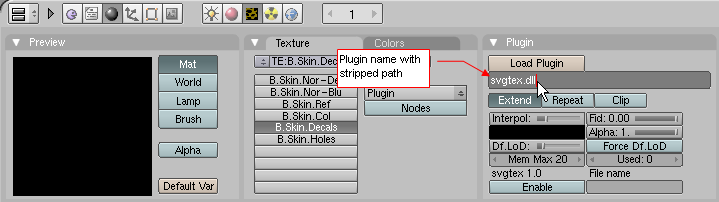
The executable file of this plugin is named svgtex.dll.
It is zipped, together with a SVG viewer (svgview.exe) into a single *.zip file.
Unpack its content into a folder on your disk (for example - plugins/texture in the Blender directory).
To use svgtex, change the type of texture to Plugin (Fig. 1.1):
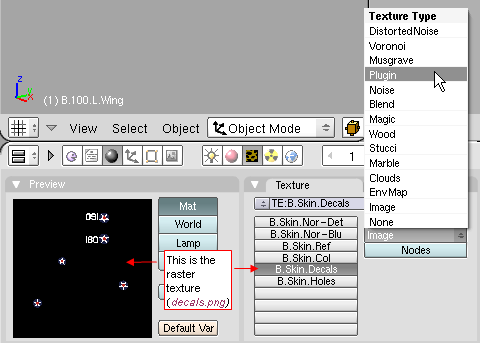
|
| Fig. 1.1 Changing the texture type: from (raster) Image to Plugin |
It will change the layout of Blender panels. Panels of the raster image will disappear, replaced with a new one,
named Plugin. At the beginning, it will contain the Load Plugin button, only (Fig. 1.2). Click it:
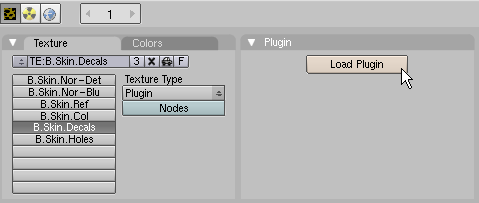
|
| Fig. 1.2 Initial layout of the Plugin panel |
In the file selection window select the svgtex.dll file.
You must turn off the Relative Paths option (Fig. 1.3).
If you leave it enabled, Blender will not load svgtex.dll!
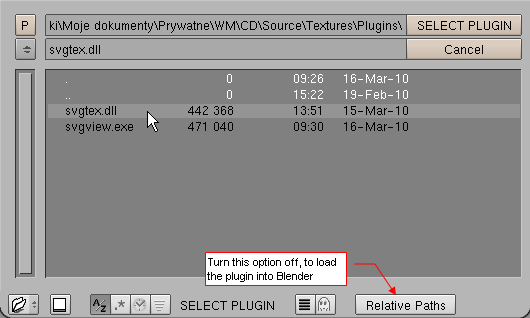
|
| Fig. 1.3 Selecting the plugin file |
Properly loaded plugin should display additional controls in the Plugin panel (Fig. 1.4):
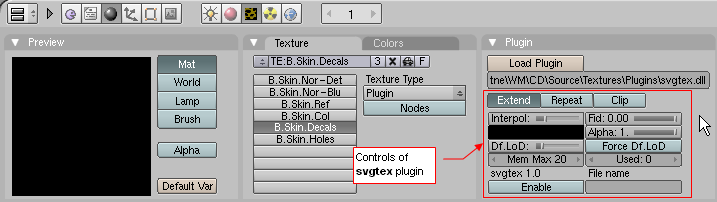
|
| Fig. 1.4 Controls of svgtex plugin |
Using absolute paths in a Blender file may lead to some troubles, when it is placed on another computer.
The plugin may be available there from a different directory. In such case, you would have to setup it again,
setting anew all the controls in the Plugin panel.
It would be easier to type in the Plugin panel just the *.dll file name
(svgtex.dll, for example) - and let the system to find it!
Well, fortunately it is possible. You have just to place all your favorite plugins into
one directory, and add the path to this folder to Path environment variable.
Do following steps, to change the value of environment variables in Windows:
- Highlight the My Computer icon and open its Properties;
- In System Properties dialog window go to the Advanced tab
and press the Environment variables button (placed at the bottom of this dialog);
- In
Environment Variables dialog window, on the System variables section, highlight Path
variable on the list and press the Edit button
- In Editing environment variable dialog append the path to the directory that contains the
Blendera plugins. (On my computer its is C:\Program Files\Blender\plugins\texture).
Take notice, that the colon character is used as the separator of the subsequent paths.
Make sure, that it is placed before and after name, you have typed there.
When the plugin file is located in one of the folders, enlisted in the Path value,
you can remove all directories from the Plugin panel (Fig. 1.5).
On another machine you can place in the system variable the path to another folder. As long, as the
plugin file is available in one of Path directories, Blender loads it properly.
|
| Fig. 1.5 svgtex plugin, specified in the "machine independent" way |
Type in the File name the path to the SVG file (in this example it is named decals.svg).
You should always type relative paths - relative to the *.blend file, you are working with.
Change the background color to dark grey, Alpha to 0,
and turn Enable on. Picture of the SVG file will appear in Preview panel (Fig. 2.1):
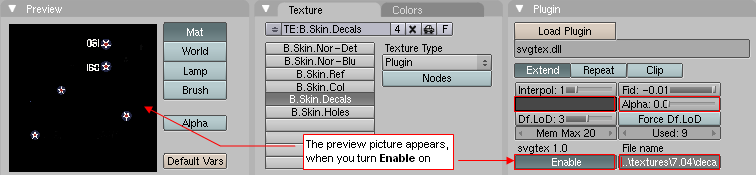
|
| Fig. 2.1 Example of vector texture - national markings of the airplane |
On an error, the content of the Preview panel is solid red. In such case, you should look at Blender
console, to read the error messages from svgtex ("missing SVG file", for example).
The vector texture looks like the raster one, on the preview (compare it with Fig. 1.1).
In this example, this is a texture with national marks and other emblems, placed on the airplane skin.
How does it look like on the final render?
BEWARE: to obtain svgtex effects, you have turn on the OSA switch (in Render panel settings). Otherwise, the content of SVG
file will be placed in a default, usually low, resolution
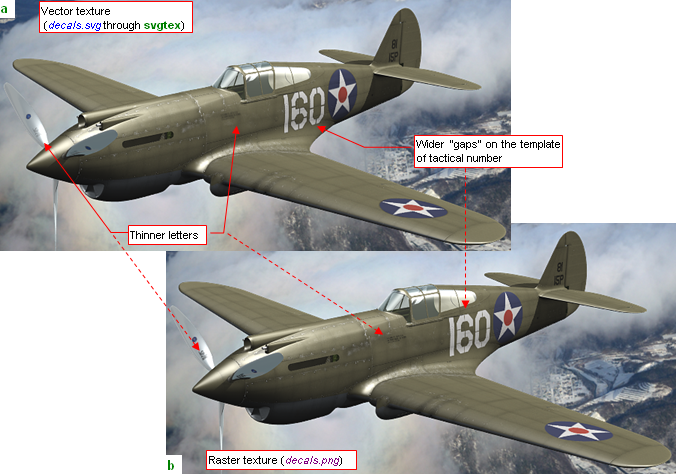
Fig. 2.2 shows the model with the vector (a) and raster (b) markings.
(Raster texture is named decals.png, and has size of 2048x2048 pixels):
|
| Fig. 2.2 Comparing vector and raster textures — the camera is in „normal” distance |
Frankly speaking, comparing Fig. 2.2a) and Fig. 2.2b) is like typical puzzle: "find all differences".
It was hard to find the two, I have pointed on the picture. I think, that both have the same source: svgtex
uses simpler pixel approximation filters than Blender for the raster images. Anyway, there are no visible advantages
of the vector texture over the raster one.
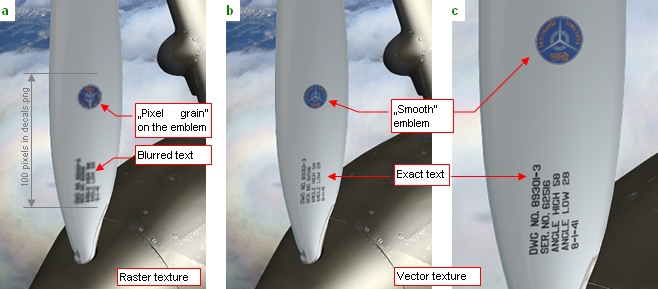
So, let's take the camera closer to the model - for example, to the propeller blade (Fig. 2.3).
The Case (a) is a render with the raster texture, the case (b) - the same shot, but with the vector texture.
The case (c) it is even closer render with vector texture. You can read the inscription on the blade, and even the
letters on the Curtiss Electric Propellers emblem!:
|
| Fig. 2.3 Comparing small inscriptions in the raster (decals.png) and vector (decals.svg) version |
Conclusion: vector textures are useful, when you are planning to bring the camera closer to the model.
The main idea of svgtex isn't any mystery. During rendering,
Blender requests from the plugin a value for a single texel. To respond, svgtex renders
fragments of the SVG picture into a raster images, kept in RAM memory.
They will be also used on next Blender request. Every "rasterized" fragment has dimensions of
256x256 pixels. (It allocates a 1 MB of RAM). The original SVG picture is divided like a
checkerboard, into squares of unified area. Svgtex prepares and keeps only such "fields" of this
"checkerboard", which contains pixels (texels) requested by Blender.
In addition, when all pixels of such field have the same color, it keeps the single,
"representative" pixel of this fragment, instead of 1 MB of identical color values.
Svgtex creates raster fragments for many versions of the source picture.
Each subsequent version has four times more pixels, than the previous one.
First version fits into single fragment (256x256 pixels). Second one has size of 512x512 pixels,
and is built from four fragments. The third version has 1024x1024 pixels and contains 16 fragments.
Speaking language of computer graphics, each picture in this sequence has different Level of Details
(short form: LoD). This level is an integer number. In svgtex, I have used following convention:
the size of 256x256 pixels has LoD = 0, 512x512 pixels - LoD = 1, 1024x1024 has LoD = 2,
2048x2048 - LoD = 3, etc. Responding to Blender request, svgtex determines the optimal LoD
of the image, and returns the pixel from appropriate picture version. If requested fragment is not prepared, yet
- svgtex generates it at this moment.
This plugin was written mainly for my own needs. In spite of this, thinking a little about the potential other users,
I have implemented most of the SVG 1.1 features. (It took a few months!). What was
not implemented, is listed below:
This plugin was written mainly for my own use. In spite of this, thinking a little about the potential
other users, I have implemented most of the SVG 1.1 features. (It took a few months!). What was not
implemented, is listed below:
- markers — because it would require a lot of work, and I have never used them in my drawings;
- filters — actually only one type of the filter is implemented: Gaussian blur.
I have not need the others, yet. Anyway, I have prepared for them a "filter framework" in the code,
which would allow to implement the others without much effort.
;
- text — svgtex interpreter ignores the SVG internal types. In Windows it draws text using any
True Type font (use this kind of the font for vector textures). In the source code there is a place,
prepared for the other kinds of the type - FreeFont, for example. I have no need to implement them,
because I use this plugin in Windows, only.
- raster images — all references in the SVG file to such images are ignored. (It is possible to add them to implementation)
Svgtex is a specialized program for vector pictures. Anyway, using AGG library, it is relatively simple
to add to implementation of this feature to the code.;
Of course, the old wisdom of the programmers tells that "in every code remains at least one not fixed bug". This
component was always compared with Inkscape results. It passed a "real-life" test on the pictures, I have prepared for
my models. I think, that most of its bugs have been eliminated. In case of problems, remember that you can use
the
source code
The layout of svgtex controls on the Plugin panel is the effect of many painful
compromises with restrictions of Blender's data structure (defined in plugin.h).
For example - the path to *.svg file should be the first control.
Unfortunately, it was hard to incorporate any text value there - I had to copy solution from
vectex component, although it is not documented on the Blender Foundation pages.
I have tried hard, but it occurs that the only possible place for the file name is the last field,
and the last control of the plugin (Fig. 4.1):

|
| Fig. 4.1 Functions of svgtex controls |
Below you will find the descriptions of all svgtex controls (in the same order, as they appear on the panel):
- Extend/Repeat/Clip: Determines what should be passed to Blender,
when it requests a texel from the outside the picture area.
(Similar, switch, with more options, you can find also in the raster textures: see Shading:Texture buttons, Map Image panel).
Meaning of subsequent alternatives:
- Extend: outside the picture, duplicate pixels from its borders;
- Repeat: picture is duplicated to the infinity;
- Clip: outside the picture draw nothing (returns a transparent black pixel);
- Interpol (interpolation): The level of pixel "smoothing".
When Interpol = 0, svgtex uses the pixel nearest to requested texture coordinates.
In such case in some places of the model you can see the "grain" of the pixels.
For value = 1, the color returned to Blender is an average of four pixels, located around requested point on the texture.
When Interpol = 2 — it is an average from 16 nearest pixels, and with Interpol = 3 svgtex uses 64 pixels
located around the requested point. Every increase of interpolation level makes the texture more "blurred". It
also increases the fragment generation time (each level requires four times more calculations,
than the previous one). I expect, that usually you will use Interpol = 1 or 0.
-
Fid (fidelity): Controls the texture resolution. Possible settings vary from -5.0 to 0.0. The value of 0.0 means the
highest resolution. (It uses pixels from the single picture, which has LoD >= requested by Blender.
This setting is also one of the fastest).
Every lower Fidelity value degrades the resolution of the image, calculating the texel value as an average
from two images of different LoD. It makes the difference between the pixels "softer" (eliminates the "grain" effect).
For example, let's assume that for a particular Blender's request, svgtex determined the optimal LoD = 4
(it means picture 4096x4096 pixels). If Fid = -0.5, svgtex returns to Blender a texel color, which is
a mix of 50% from the picture having LoD = 4, and 50% from the picture having LoD = 3.
Such averaging between two pictures is in computer graphics called mipmapping.
When Fid = -0.2, svgtex returns a texel which has color of 80% from LoD=4 (4096x4096) picture,
and 20% from picture of LoD=3 (2048x2048). When Fid = -1.6, then svgtex use 40% of 2048x2048 picture
(LoD = Max(LoD + Fid) = Max(4 - 1.6) = 3) and 60% of 1024x1024 image
(LoD = Min(LoD + Fid) = Min(4 - 1.6) = 2).
Anyway, do not escalate this setting - use Fid between -1.0 and 0.0 for bump maps,
and Fid = 0.0 (no mipmapping) for color textures.
-
background color: Standard Blender color picker to select the background. This color is visible where the source SVG
picture has transparent areas, only. (To keep them transparent, set Alpha to 0.0).
Notice that on the decals.svg texture form the model enclosed to this page, the Alpha is just
set to 0.0. In spite of this, the background color has a slight influence on the borders between opaque
and transparent areas. That's why I have proposed to set it to grey (40% black) (Fig. 2.1). If you set it to black, the
contours of the star roundels get an additional, darker tone.
-
Alpha: opacity of the background color. Set Alpha to 0.0, to preserve the
transparent areas from the source SVG picture;
-
Df.LoD (Default Level of Details): When you turn Enabled on, svgtex generates
complete pictures (all fragments) having LoD <= Df.LoD.
The picture version of this LoD is used as default when the OSA
(oversampling) render setting is turned off.
Usually set it to level 1 or 2. Higher values can make the time of displaying on the Preview panel much longer!
-
Force Df.LoD: Forces on svgtex to always use the image version having LoD = Df.LoD,
regardless of Blender requests;
-
Mem Max: Maximum amount of RAM (in MB), which can be used by svgtex for image fragments. Select this value with care,
observing the value displaying by the Used field (on the right). If you set Mem Max on the level
below typical Used value, sometimes plugin is forced to "drop" some fragments, to make place for a new ones.
These discarded fragments still can be requested during the same render pass, and svgtex will generate them anew, few
moments later. To find place for them, it will drop another fragments, and so on. It can make the time of rendering
longer;
-
Used: Field used for information purpose, only. It shows actual amount of RAM, used by the image fragments (in MB).
Sometimes it can exceed Mem Max a little - it is the size of the *.svg file content.
Used lets you to make better decision, how to set Mem Max value in an optimal way: to not consume too
much memory, but not to slow down the rendering process;
-
Enable: Enables the texture (it becomes "visible" to Blender). When you turn it off, all image fragments are released.
(This effect you can use to reset the svgtex memory);
-
File name: Path to *.svg file, or (what is described in the advanced part)
- *.xml shortcut. This field isn't too long - you can type up to 63 characters. The best practice is to use
relative paths, here (relative to actual Blender file). This way, when you move the whole project folder to
another place, it does not spoil the rendering;
After this exhausting description, few simple practical advises:
On the first use of a large, detailed SVG file, set the Mem Max limit to 40MB or higher.
Generate the first rendering, and look at the Used value, to check how much RAM is consumed by svgtex.
When Used < Mem Max, set Mem Max to 110% of Used. When Used = Mem Max,
increase Mem Max and repeat this process.
For the texture of markings and other sharp, detailed drawings, use Interpol = 0 or 1 and Fid = 0.0;
For bump maps use Interpol = 1 and Fid = -0.5, to make the groves smoother;
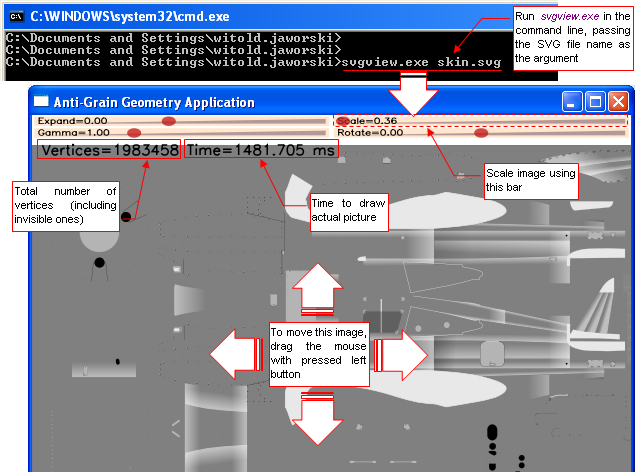
This SVG file viewer is a „byproduct” of the svgtex development. It is placed in the same folder,
where svgtex.dll file. Svgview.exe is, in fact, the test program from the examples enclosed to
AGG library. I have used it to debug the SVG parser, before using it in the svgtex plugin. You can use
svgview.exe to check, how svgtex will display a particular picture. To do this, just run it from command
line, passing the path to the *.svg file as the argument (Fig 5.1):
|
| Fig. 5.1 Using svgview.exe |
Use the Scale bar, at the top of the screen, to zoom the image. To move it (panning), just
drag the mouse (with left button pressed). The picture is redrawn after every change of the scale or place.
The numbers at the top of the screen (Fig. 5.1) shows, how many vertices have been encountered, and
how much time actual picture has been drawn.
Take notice on large number of vertices on the Fig. 5.1 - nearly 2 millions.
This is my „stress test”: skin.svg file.
It contains all technical details of the skin of the P-40B airplane.
It is a serious effort for a SVG parser, to draw it. Airplanes have riveted skins, and each row of the rivets
is a line of the text, there. Each rivet is a round "dot" character, and distance between them is typed with spaces.
Rivets are so small and pale, that you cannot see them, on Fig. 5.1. But open this image yourself,
with svgview.exe. When you increase the scale on the fuselage or wings, you can see these small circles, darker just by a tone.
Nearly all (95%) among 1 983 458 vertices, counted by the program, belong to the rivets (32 vertices per one).
Such huge amount of text - 50 thousand of dots, not counting spaces - is a challenge for SVG parser. At final stages of work
over this drawing, my Inkscape slowed down so much, that I started to measure the redraw time of skin.svg (there was nothing more to do, anyway).
Then I started to compare it with the other SVG interpreters, I have on my computer: Firefox web browser, and my svgview.exe.
Fig. 5.2 presents the results. Thy were measured on my laptop (Dell Latitude 610 - Intel Centrino 1.6 MHz, 1GB RAM, Windows XP):
|
SVG interpreter
|
Redraw time (s)
|
RAM usage (MB)
|
|
Inkscape 0.49
|
45.0
|
398
|
|
Sketsa Editor 6.3
|
from 2.0 to 20.0
|
350
|
|
Firefox 3.5
|
12.0
|
27
|
|
svgview.exe
|
1.5
|
2
|
| Fig. 5.2 Time and memory, consumed to redraw the skin.svg file. |
As you can see, svgview.exe needs only 1.4 second and 2 MB RAM to draw this file,
while the same thing takes Inkscape 45 sec. and 400 MB RAM! It is a surprise -
I ensure, that in svgview code there are plenty of places for simple optimizations, not implemented, yet.
The program itself was compiled in MS Visual C++ 6.0, dated from previous century (1998).
Well, Inkscape is an editor, so it has to keep and process SVG data in another way, than the simple viewer. But look
at another SVG editor: Sketsa. Somebody did a serious optimization of drawing process, there. When you use zooms < 100%, it
has redraw time of 2 seconds. For zooms > 100% it redraws in 5 to 20 seconds, depending on the zoom value.
I think that the tremendous amount of memory and time, consumed by Inkscape, is the evidence of an error in
its architecture.
On the other hand, Sketsa has less functions than Inkscape. What's more, it shows a white screen for the attempt
to zoom skin.svg to 400% or more. It hangs when you try to select an element from this drawing. I do not
recommend this editor.
I have not expected to create so fast interpreter, although AGG template library, used by my parser, lets the compiler to
create fast, optimized binary code. I suppose that this is the reason of its superb performance!
You can have more control over svgtex, placing in the
File Name the path to a special
*.xml
file, instead of
*.svg picture. I called them
XML shortcuts, because they point to a SVG file or
files that compose the texture. They are also able to "modulate" many properties of the source drawings: switch
the visibility of their layers, add additional blur, etc. This is optional feature, which require basic knowledge
of the XML syntax. If you want to learn more —
go to the page about
XML shortcuts.